Essential statistics
- Length overall - 16'
- Beam at trailer bed - 7' 6"
- Beam at rubrails - 8'
- Weight - about 2500 lbs
- Draft - 5"
- Headroom - 6' 5" at center
- Power - 5-10 hp outboard
- Speed - 5 kts downhill
Features
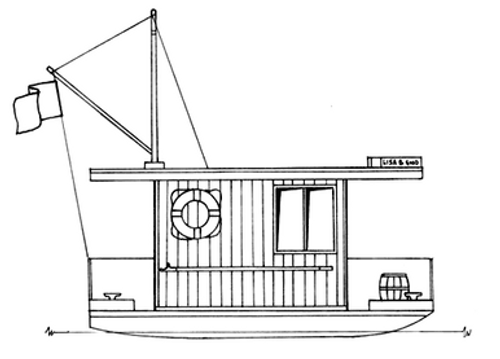
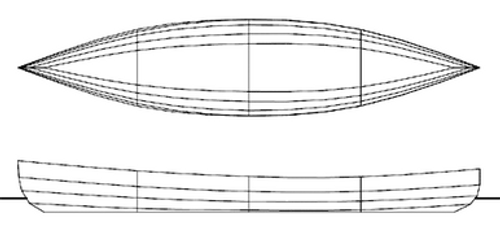
“Lisa B. Good” is the result of a discussion on the Yahoo Shantyboat Group. The design turned out to be an economy sized Shantyboat, about the minimum size that offers stand-up headroom, decent deck space, and long-weekend accommodations for a couple. I got thinking about the boat’s overall length today. I’d build her 16 foot as drawn. That length is handy, because you can easily get lumber that long. But there’s no reason why you couldn’t splice the longitudinals and facias to add a few feet to the middle of the boat, if you needed more room. Just keep the ends the same and take the extra length for the cabin or the decks as you want. Lisa B. is a very simple boat, and construction will be particularly straightforward; should be a quick build. There are only two curves on the boat, the bottom of the hull, and the crown in the cabin roof. The wood is all construction grade lumber and plywood. Use is made of epoxy and glass, but just enough to ensure long life without rot or excessive maintenance.
“Lisa B. Good” has great lower decks. They’re covered to keep the rain and sun off. The forward deck is wide enough to allow crew to pass in front of you while you’re sitting in a deck chair. The aft deck accepts chairs comfortably. Make sure there’s a proper safety net and lifelines up on the bow, especially if there are kids aboard. A kid could be run down and into the prop in seconds, with that square bow. Gives me the willies thinking about it. The upper deck is strong enough to allow a 200 pounder to walk up there, but it’s not for continuous use. Freeboard is not excessive, but the bulwarks, freeing ports, and sealed decks will help in a hard chance. Lisa B. is stiff enough initially. A 200 pounder standing in one corner up forward will push it 3” lower than the other side, and drop the bow 2½” lower than the stern. She will right herself from heeling to about 40 degrees, but very shortly after that she’ll go onto her side and stay there. Clearly a boat for sheltered waters.
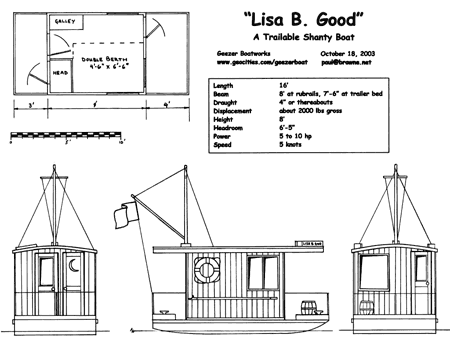
This is one of the 8 detailed drawings included with the free plans
See the full arrangement drawing. The cabin is small but adequate, 9’ X 7-6”. There’s room to set up a fullsized standard double bed, 4’-6” X 6’-6”. The galley is compact. The fridge should be an icebox set out on the aft deck. The stove should be a propane camp stove. It might be best if the sink were a plastic dishpan. Deck chairs are suggested for interior seating. It's a more flexible arrangement, because you can use them on deck, and fold them up at night too. As drawn, Lisa B. has a head with an outside door, but it could be inside easily enough. A bucket would be the best head. And a 5 gallon bucket of warm water topside, fitted with a kitchen sink squirter hose, that would work better than anything else for a shower.
The engine is simple, an outboard kicker clamped onto the stern bulwark. I struggled with the steering, looked at motor wells, extended tillers. I give up. The best arrangement would be control and steering cables to a helm under the starboard forward window. Maybe have an external steering wheel too, so you can sit outside. The fuel tank should be a portable tank strapped down to the aft deck. Lisa B should be a great trailer boat, except at 2500 lbs dry we might wish she were a little lighter. The beam leaves just enough width for the trailer wheels, while staying below the legal 8-6". If you build a simple custom trailer, you can keep the height down and use her as a camper. She'd make a great hunt cabin too. You might even fit a little water tight well in her, and drag her onto the ice with a tractor for ice fishing. The mast is of course optional. But a fellow needs a way to fly the right flags; otherwise he’s got no couth.
Image
Let’s face it, Lisa B. isn’t going to win any races. And if you try to dress her in aluminum siding and such like a houseboat, she’ll just look amateurish. “Lisa B. Good” is a shantyboat, and she gets her charm from looking old-fashioned. So let her look the part. Use wood for the siding. Fit the mast and boom. Stow the anchor rode in a wooden barrel. Add a bit of gingerbread trim in the corners if you like it. Forget the varnished teak trim; paint it. Hang your coiled dock lines on the exterior cabin walls. Fit her with kerosene lanterns and a wood stove. If you want to doll her up, pay a talented local artist to paint a suitable scene on MDO plywood for you, maybe lumberjacks on a river drive. Hang that on an exterior cabin side. I guarantee folks will like the boat, and so will you. Beauty may be in the eye of the beholder, but I think Lisa B’s got the looks!
Materials
- Wood -
Well-dried construction grade softwood will do nicely for the framing. Exterior grade plywood should do for the hull. T1-11 textured plywood would be a natural for the cabin sides, but it’s criminal how easily the stuff rots. If you use it, better brush on epoxy or polyester both sides before painting. - Fasteners -
Robertson (square drive) screws are now stocked in many building supply stores. They make them coated or stainless for building patio decks. With battery operated drills and these fasteners, nails are now obsolete. You can use the coated screws on the cabin framing and under the fiberglassed hull if you want to save a buck, but use the stainless to fasten the siding in place. I think I’d use the stainless everywhere. They’re not that expensive. - Caulking and bedding Compound -
Use “Poly Seam-Seal” caulking (comes in a tube) for bedding and caulking everywhere above the waterline. It adheres well. It lasts, and you can paint over it. Silicone is useless. 5200 marine sealant is overkill. - Glue -
Use “Tite Bond III” exterior glue for joinery. It works very well and it’s friendly. It’s wonderfully waterproof too. You can use epoxy of course, but it’s miserable stuff. So are the urethane adhesives, like PL Premium, that come in a caulking tube. - Filler Putty -
Use epoxy thickened with microsphere filler for crack and hole putty on exterior wood surfaces, and to fill in the weave on fiberglassed surfaces. Takes three days of warm weather to cure enough for sanding, but then it sands easily. Get the consistency right, sort of like peanut butter. Add enough microspheres so that the mixture doesn’t sag. If it sags before it sets, you need more filler. For interior work that’s to be painted, try waterproof sandable spackling compound. It’s great stuff. - Fiberglassing -
I like 10 ounce glass cloth in epoxy to waterproof plywood. A thin mat will work too, but it won’t go around the corners easily. Epoxy takes a few days to cure enough to be sanded. And it needs to be sanded before anything goes on top of it. Some fellows use polyester instead of epoxy, because it’s friendlier, cheaper and it cures much quicker. But polyester doesn’t stick if the wood it’s on gets wet. You might be successful with it on the hull, however, since it’s completely encapsulated. But I’d use epoxy. The top brands like WEST are the best, but they’re too expensive. You can get by quite nicely with a $40 per gallon epoxy. Shop around. Once you’ve applied the fiberglass, you’ll likely want to fill the weave in and sand the surface smooth. Use epoxy/microspheres for this. Bondo won’t stay put on underwater surfaces. You can spend a month of Sundays doing this, filling and sanding, filling and sanding. Don’t get carried away. You should be rolling your paint on afterwards, and that will leave a slight stipple finish anyway. She’s a shantyboat, not a gold plated yacht. - Paint -
Use a two-part epoxy or two-part urethane paint for the decks, cabin sides, and roof. Sprinkle budgie gravel onto the wet paint for non-slip walking surfaces. Put it into a bottle with a plastic lid. Drill the top. Experiment with the hole size until it works well as a shaker. Don’t pre-mix the gravel into the paint. Urethane paint won’t chalk. Epoxy paint eventually will. Ship or industrial suppliers sell urethane paints for a lot less than retail boating supply stores. You don't want $400 per gallon Awlgrip here. You want something like Interlux “Interthane” at $50 per gallon. Some builder’s supply stores sell two-part epoxy concrete paint, supposedly for garage floors. You can use the aforementioned paints on the hull topsides and bottom too, or you might use a good exterior gloss latex. Latex stands up surprisingly well, even underwater. Oil-based or enamel paints are useless on exterior surfaces.
Leaks
Leaks are miserable destructive things, hard to find, harder to fix. With the hull and decks completely glassed, there’s no excuse for the hull to leak ever. You want to glass the roof right down over the facia and the end beams for the same reason. And bed any attachments to the decks and roof generously with Poly Seam Seal. Goober up the screws generously too, before you drive them.
Hatches always leak, no matter how you make them or how much you pay for them. So don’t put any hatches in the roof above the cabin, and don’t put hatches in the lower decks. If you want a hatch to get topside, then put it over the fore or aft deck. The simple hatch detailed in the drawings will leak less often than most. You’ll want to get below the cabin sole of course, and hatches inside the cabin need be little more than a piece of plywood. You can reach up under the decks from hatches inside the cabin. Don’t forget the drip groove in the facias. And buy windows with a flange and bed under that too. Did I mention I hate leaks?
Windows
I like aluminum windows, horizontal sliders if they’re to open. The black anodized frames look sharp. As mentioned above, the household type with a flange works well. The glass should be at least tempered. Laminated safety glass is the best of course, but wouldn’t that be overkill for a riverboat? New windows are expensive, but old ones are prone to leaks. You can likely frame in simple panes and come up with fixed windows that don’t leak, especially under the overhangs on the end walls and in the doors. But you’re not likely to be happy with home-made opening windows for the cabin sides.
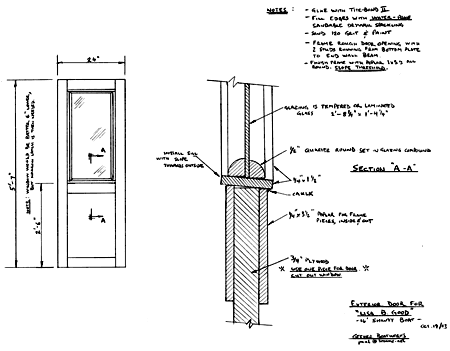
Doors
New custom doors are expensive. The plans show how to make doors that won’t get loose and come apart, without having all the machine tools normally used. The trick is to use a single piece of 3/4” plywood, cut out the window opening, and then apply trim pieces with finish nails and glue. A bit of filler around the edges, a little caulking, some sanding and paint, and you’re done.
Tanks
I wouldn’t put a fuel tank down there, but there’s room in the hull for lots of water tanks - black water, fresh water, gray water, firewater, and all kinds of pumps, hoses, wires and switches. If you’ve got the money and the patience, go ahead. Just make sure your hatches are big enough to get them in and out. Metal tanks leak. Plastic tanks are better. I’m a bucket and jug man, myself. Life is too short for tanks and plumbing and pumps.
Bilge Pumps
Do some thinking on whether you want limber holes through the longitudinals and one bilge pump, or three hull compartments and three pumps. Or maybe you want to glass in 1/2” ply dividers around amidships somewhere, to make 6 separate hull compartments. That way if you hole one, she would still stay afloat.
Know what I think I’d do? I’d make 6 compartments and have hatches enough to check them all, maybe cover two or four compartments with one hatch. That way, when I hauled her, I could open the hatches to air out the hull. I’d carry a manual bilge pump to stick into a compartment if needed. And I’d carry a prenailed plywood patch and a squeeze tube of some sort of goop.
In any case, if you don’t sneeze from the bilge dust, there’s a problem somewhere. Lisa B’s bilges should always be right dry.
Tools
I don’t know how handy you are with tools. But if you’re not handy now, you will be when you’re done, especially with that Skilsaw and the angle sander. You won’t need many tools to build “Lisa B. Good”. Let’s see here:
- Carpenter’s square
- C-Clamps and bar clamps
- Miter box
- Cross cut hand saw
- Rotary power hand saw (Skilsaw) with carbide combination blade and plywood blade
- Sabre Saw (Hand Jig Saw)
- Level
- 25 foot measuring tape
- Battery operated drill, 9.6 volt or higher. (Makita makes drills with good keyless chucks and good battery systems.)
- Twist drill set
- Wood bit set
- Combination drill/countersink/driver kit for screws
- Bits for your drill to drive Robertson (square) and those cursed Phillips screws. Get them long enough.
- Random orbital sander (Get one that takes stick-on sandpaper discs. The Velcro ones are useless.)
- 80 grit sandpaper discs for above
- Angle grinder with rubber sanding attachment (You’ll become an artist with this tool. It’s wonderful.)
- 40 grit and 80 grit discs for above
- Dust mask
- Goggles
- Safety glasses
- Chalk line
- Carpenter’s apron
- Two sawhorses
- Portable, folding, clamping work bench (Workmate)
- Extension cord
Doubtless I missed some, but that’s most of it. Notice they’re all hand tools.
Building Sequence
No strongback, frames, moulds, or jigs. Not much different from building a small cabin, except for the glass/epoxy work, and the need to flip the partially built hull. You’re going to drip paint and epoxy all over, so bear that in mind when you select a work place. If you’ll be working over a lawn or gravel or dirt, then you might set up a couple of 8 foot 4x4s on blocks or posts. Get them parallel and level, about 8 feet apart. You can assemble the hull on them. Most everything on “Lisa B. Good” is square, so once you get the hull straight with the world, you can use a carpenter’s level to frame up the cabin, which is a great time saver.
- Glue up and cut out the four hull longitudinals.
- Get them up side down, spaced right and level.
- Install the bottom frame cross pieces.
- Install the bottom plywood. It should take the bend.
- Fill any gaps and screw holes on bottom and sides with epoxy/microspheres mixture.
- Round the bottom edges with angle sander.
- Sand bottom and sides with orbital sander-80 grit.
- Glass bottom and sides.
- Fill weave with epoxy/microsphere mixture.
- Orbital sand 80 grit.
- Paint bottom. Roll it on.
- Flip work over and level it up.
- Install the beams, the hull ends, and the hatch framing.
- Now’s your chance to paint the inside, if you’re going to do it. Use epoxy paint.
- Deck it over.
- Install 2X6 plates and fillet the outside corners.
- Fill any gaps and screw holes with epoxy/microspheres mixture.
- Round the hull edges with angle sander.
- Orbital sand 80 grit.
- Mask and tarp lower part of hull sides.
- Glass decks and outsides of plates.
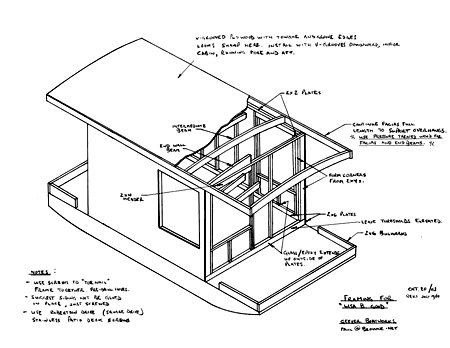
- Frame and sheath cabin.
- Install cabin roof beams.
- Install facias both sides.
- Install beams for overhangs.
- Screw on upper decking, don’t glue.
- Fill any gaps and screw holes with epoxy/microspheres mixture
- Round the roof edges with angle sander.
- Sand with orbital sander-80 grit.
- Mask and tarp off cabin and hull.
- Glass roof down to bottom of facias and end beams.
- Fill weave on decks and roof with epoxy/microsphere mixture.
- Orbital sand 80 grit.
- Paint. Roll it on. Apply grit for non-slip.
That’s the heavy stuff. The rest is straightforward finish carpentry, plumbing, painting, and fitting.
Paul Browne, CC&BW

