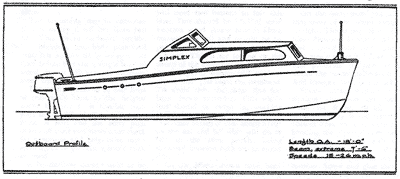
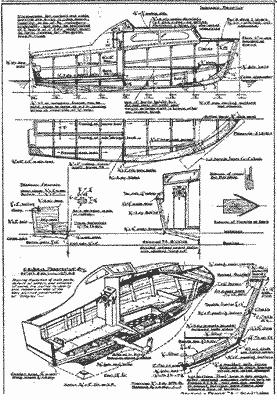
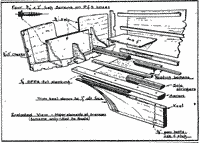
"SIMPLEX" — 18' Military type outboard cruiser, wood. Beam 7' 6". Two bunks forward. Includes lines, offsets, construction drawings, etc. 4 sheets plus article reprint.

click image above for larger view
UP IN THE lake states where outboard motors are made - Wisconsin, Minnesota, Michigan - you'll find a bewildering maze of waterways ideally located tor intriguing cruising. On these waters it either blows like sixty and everyone stays ashore, or it doesn't blow at all and everyone and his brother goes afloat. For such water and service was Simplex designed.
She is boxy and big for her inches. She is as simple as possible to build, giving consideration to strength and the whopping loads that craft of this type are asked to carry.
Simplex is not the last grunt in speed, nor exactly the kind of boat for open water. On these points I'd prefer Sundance, the forerunner of Simplex, which appeared in last year's Boatbuilding Annual, a few copies of which are still available.
But when it comes to breezing off the girl friend, or taking out a pack of kids in calmer water, Simplex will provide the passenger-carrying bulk you need. She is contemporary in looks, and should please the Neo-Whistler or Hot-Diggety school of boating advocates, for I have borrowed something from my PT boat designing experience and have given her something of that military persuasion. She is a good all around boat; simple and cheap to build.
Simplex is one of the few designs that can handle twin engines if need be. She will handle two 15 or two 25 hp outboards with ease, although she'll be quite lively with one of either.
One reader of last year's Boatbuilding Annual built a Sun Dance for $198.50. Simplex will cost only a few bucks more, this extra cost being chiefly in the Plexiglas for the cabin lights.
You'll need ample space in which to build her, as the 14-foot forward topside plywood panels are "wung out" very wide when fastening to the stem, bending through approximately 45° of arc.
This will take space, and more than one pair of hands. This bend is wide and reasonably easy, but will take some doing. But it is being done every day, and the lines of Simplex have been generated on the developed surface principle from transom to frame No. 1 to make bending easy.
Forward of that point, her lines depart from purist theory, and a faint tuck is taken in her topsides to give the FT boat stem profile, now being ardently copied by some hull draftsmen.
Building outdoors is feasible if you use a six dollar Koroseal car garage covering, particularly in the dry season. Rain spoils nice surfaces and joints. Rain also knocks mating surfaces cockeyed, making it hard to get a tight hull. But aside from these few pointers, there is nothing unusual about Simplex--except her simplicity.
Her arrangement plan has been purposely left wide open. You can do what you wish about running seats, stove, lockers, and whatever suits you. Any man who can plane a smooth surface and who has an eye for a fair curve can easily build her. But wood choppers had betterleave this - and any other boat - alone.
The beginning step in construction is to lay down her lines full size. This means outboard profile, half breadths, and body plan. All must fair up and tie in on your loft floor before you cut a single stick of wood, or you will get into measurement trouble.
The profile must be in fair lines as reasonably close to the heights above baseline as is feasible with your batten. The half breadths also must be fair, and the body plan drawn off these two views must check for beamwise and heightwise intersection before you cut a single stick of wood.
A boatbuilder doesn't need to be told this - he understands why. But some amateurs think they can lay down a body plan only, from offsets, and commence construction.
If a big enough painted floor is not available, you can tape pink building paper to the floor in a couple of lengths with sufficient overlap to give you a good laying-down surface. Snap the baseline and the waterlines in with a chalkline; there is nothing more accurate.
Take a straightedge and pencil in this set of lines. Carefully erect the perpendiculars on the baseline for heights, and off the centerline for half breadths. Make sure of neat station spacing as dimensioned. You will need two battens to loft this boat. One should be 1"x1" of some knotless wood (sugar pine is ideal: mahogany good) and should be tapered for about 6" down to 1/4" at the end. This is for lofting in the sweep of the sheer line in plan view. An untapered batten will tend to give a "fiat" just abaft the stemhead. To avoid this, the sheer line has been drawn extended. This whole line should be swept in, working well back on the batten.
A small batten of oak, about 3/16" on the flat and 3/4" wide will do to fair in the stem profile, being streamed between nails set on either side.
All the offsets shown have been scaled from the original drawing from which the illustration is printed. These have again been checked with the scale model which was made to check flotation and hydrodynamics. They are believed to be accurate. But errors sometimes occur. Once in a while the right dimension gets into the wrong column, and so on.
The idea of laying down is to fair all lines closely to the offset table. Don't get into a panic if an offset is wrong. Ignore it. Then average the dimension in from the sweep of batten from other points. Simplex will float all right and run entirely all right if you'll do this.
On the body plan, you will note that most of the frame sections are straight. This is part of the Simplex idea. Plywood, however, when bent and warped will belly somewhat. The idea is to let it. I have indicated this probable bellying at points where the model indicates it occurs. And here we have a gimmick.
Frame these sections perfectly straight when you loft them, and build the frames straight section. Where a belly is indicated in the bottom lines, you can, when initially bending the plywood over the boat's frame for size, determine the amount of natural plywood belly. Add curved shim frames to pad out the curved contour. Screw and glue these shim frames to the main frames, and your problem of lofting a curved or developed surface is solved.
The reverse process is employed, on frame No. 1 where that tuck in the topside bow panel will call for a dished-in frame. You may trim out the required hollow with a spokeshave from the solid according to requirements of the bent panel. But it would be much easier, it seems to me, to build the topside frame on No. 1 about an inch shy of full, bend the panel to the sheer harpin and chine, and, after it is secure, and the hull turned over, add shim pads. Their size and bevel can now be, easily determined by scribing.
Extend all frames to the floor line indicated on the body plan. The end of the frame that hits the floor is called the "heel." Tie the heels together with 1"x4" cross spalls of rough lumber, carefully marking the centerline on the cross spall.
Because the body plan is drawn to the outside of the planking, the frames must be built 3/8" inside the sectional line to allow for planking thickness.
All planking of Simplex is of 3/8" DFPA-Ext. grade, which means marine plywood, and good two sides. Nothing else will hold together.
If you are fortunate enough to live in an up and coming locality where complete stocks of plywood are kept, you can get marine plywood in the required lengths. You will need two pieces 3/8"x4'x14' and one piece 3/8"x4'x12' for the topsides; This latter piece will be cut in half, so two pieces 3/8"x4'x6' will do, and may cost you less.
|
For the bottom you will need two pieces 3/8"x4'x14' and one piece 3/8"x4'x10'. This latter piece is also cut in two. Maybe your dealer has two five-foot lengths-they'll do. All of this is marine plywood, remember.
If you go to twin engines and the boat is to take a beating, and you want an especially long-lived job, buy five-ply for the forward bottom, 3/8" thick. This is airplane grade, birch-faced, and expensive. But if you've got money enough for two motors, you should worry.
An alternative would be to coat the bottom with glass cloth if severe service is intended, using ordinary DFPA-Ext. 3/8", 3-ply.
The gussets for the frames arc of 3/8" 3-ply, glued and screwed both sides of the frame with No. 6 3/4" flathead brass screws. If you can't afford brass, you might go to cadmium plated screws. But my experience with such screws has been that they rust out in a few years. Brass, especially Everdur screws, are long lived.
A good source of screws, if you must order by mail, is the Southern Screw Company, Statesville, N. C.
All gussets are glued with casein waterproof glue, made in small batches and used fresh. Where indicated, the gussets are left open. Otherwise they are filled with lumber molded same as the frame.
The setup of the frame is the same as lor any of the plywood boats discussed elsewhere in this Boatbuilding Annual. There is no need to rehash the obvious about that subject here. Just make a grid on the shop floor, erect the frames to the floor line, fasten up the keel and the stem to the frames, properly plumbing and horning them, and you can then install the chines, and the sheer harpin and clamps and get on with the planking.
A word on the harpin might be well, as you don't often see this typically heavy boat feature on so light a craft. I use it here because whenever a big boat shop has a yacht with bent and sawed frames which have a lot of flam to them, a harpin is always put on the molds to secure the frame ends to.
Most harpins are female, cupped to fit the flam. Here we reverse the procedure, and this flat shelf, or harpin, is band-sawed after being edge-scarfed. The drawings tell the tale.
I'd use mahogany for this member, or yellow pine (if you are careful about driving fastenings) but not oak, which would call for expert woodworking. Note that the harpin ends after its purpose of holding the shape of sheer sweep is over, and an ordinary sheer clamp is jointed and bolted to it, finishing out the sheer edge to the transom.
The drawings clearly tell the story of the subsequent construction, and you will see perspectives which are done to save a whole lot of words.
The cockpit sides are shown parallel, but an option is shown dimensioned if you want the extra room. The parallel cockpit sides will go in like greased lightning, and the resulting cockpit space will be 5'x8', which is larger than the standard small bathroom. The side decks then give nice cover room for multiple cabinets and drawers - something no boat can have too many of. In this parallel coaminged job, only the ends need bending. Boil them in a washtub for 15 minutes, bend them over a form, and horse them home with bolts through the harpin. Handy thing, that harpin!
I'd use 5/8" mahogany for the coamings. It will be cheaper to cut the window-lights out with a band saw from the solid wood than to burn up time making a mullioned and stiled frame. A way of inserting the 1/8" Plexiglas lights is shown.
You can take the panels to a sash and door factory and have them rout out the recess rabbet, or you can back the entire port area with the Plexiglas, and try your luck at cementing it to the frame, using a fillet of something like Sealer 900 or Kuhl's elastic seam compo to keep it tight. I have not shown swing windows forward, in keeping with the Simplex idea., but they will without a doubt be wanted later.

click image above for larger view
Wes Farmer
(reprinted from "Sports Afield" - 1954)


